Thursday 27 September 2012

Recover Arduino Sketch

How to recover an Arduino sketch from after a program crash or system crash.

I was working on some code today then after making a heap of code changes and uploading to boards I walked away from my computer without saving my Sketch. 

Due to some other things I was doing at the time Windows crashed and I had not saved my code yet. After a reboot I confirmed that my code was gone but I did not like the idea of that so went digging for it. I know the Hex file is compiled to the %temp% folder so the Sketch must be there too.

So Start>Run>%temp%

which took me to C:\Users\remote\AppData\Local\Temp\

Then I sorted the folders by date modified and then found this one was timestamped about the same time I last compiled my code.
C:\Users\remote\AppData\Local\Temp\build262859921630184205.tmp\

Opening the folder I see a few C++ files and one of them had the same name as my sketch but with a C++ extension. It was my Aduino Sketch it did have a few things added to it to make it C++ compatible (void's) but is was the code I thought I had lost. 


Tuesday 25 September 2012

Getting ready for more Rapman upgrades


I have received more parts so soon it will be time to try some more 3D printer mods.

Besides more screws, bolts, washers, bearings and plastic I received a few more parts to use.


  • 30mm 12volt fans. One problem I have with my Rapman is that the extruder overheats and jams when printing sometimes. To overcome this issue I upgraded the part cooling fan and ducted it to cool the extruder more then the part and added a 80mm fan to the side of the printer to help cool everything. This mostly works but effect the head heat up time but helps with  part cooling(on one side). With the smaller fans installed to only the parts that need them I should be able to control the thermals better and be able to get better print quality.
  • LEDs. I am going to add some better lighting around the printhead to help the camera (as I normally leave the room lights off).
  • PTFE TEFLON Tubing. Having a 470gram stepper motor and all the extra supports for it on a printhead seems a little silly to me. I thought that a goal would be to reduce the printheads mass so you don't have to counter/fight as much inertia. So if I mount the fillament feed away from the printhead I and feed the fillament to the printhead via the PTFE tube I should be able to have a printhead that is less then 30% it's current mass. This will allow me to improve the movement speeds of the printhead while reducing the power required to move it and reduce the strain/wobble from the printhead's inertia.
  • New hotend. The hotend on the Rapman comes sealed in fire cement, on my printhead it is crumbling and leaving what looks like sand everywhere.  It is about time for me to replace. I have resurrected the old printhead a few time already but as the resurrections are becoming more involved and makeshift I am expecting it to soon hit a point where I just need to let it die in peace. After it dies I might use it to recycle my waste PLA back into fillament.       
It is now getting to a point where I can almost make a whole new printer, so that might be were this project ends up. I think it should be easy to make a lowcost PLA 3D printer that is a fraction of the price of the current 3D printers available. By limiting it to PLA and dropping the printhead mass you should be able to lower the stepper motor size and power requirement which would allow you to use smaller motors and motor drivers so you could use lower cost of everything leaving you with a smaller cheaper 3D printer.  

Saturday 22 September 2012

Tinkercad Gnome


I recently discovered https://tinkercad.com.

A very user friendly online CAD application that allows you to quickly design 3D objects and download them as STL files ready for 3D printing. 


Here is a Gnome I created in just a few minutes.
https://tinkercad.com/things/9NMMuTF6O3s-gnome


and here is him after I printed.

The Tinkercad UI is very straight forward and basic and only takes a few minutes to learn and master.


Now for the next step of adding RFnodes to them to create my Gnome army


3D Printer setup

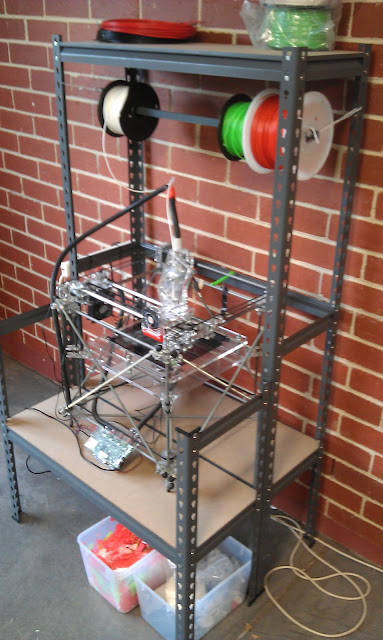
I have upgraded my 3D printer setup.

Now instead of him sitting on a cardboard box he has his own rack and I can have the spools of plastic hanging above him (need to get more plastics to fill the space) 


I have also added one of the routers with openWRT, some LEDs for lighting and a Logitech c270 HD webcam so I can remotely keep an eye on him.  

I am in the process of upgrading his printhead to support better cooling for the extruder and printed part also will have a few built in lights and maybe a small camera.

Once I get my Makibox printer I might have to expand the setup even more.


Wireless mesh-able RGB lights and a ATMEGA88


I thought I might test out using the Atmega88p-20au instead of the Atmega168 as a processor for my RFnode. The Atmega88 is a cheaper version of the Atmega168 with only half the flash. 

I had tried using a Atmega8 before but found it did not run too stable at 3.3volts which I need to do to support USB. The Atmega8 datasheet said it  needs 4.5 - 5.5 volts but I was going to give it a go anyway, It did work but I found that about 1 in 5 times I when flashing it I would get an error and would have to retry.


Reading the datasheet the Atmega88 is identical to the Atmega168 with the main differences being just the amount of flash/ram. So hardware wise I did not need to make any changes except the IC but from a software side I did have to change my code a fair amount to get it down to 6KB. The Atmega does have 8KB of flash but I am using 2KB of that for the bootloader.  

After removing all the sleep/watchdog functions and cutting back the meshing support I was able to get my code to less then 6KB and still be left with a wireless mesh-able RGB light with a just enough code space left to added a few basic sensors. 

This version of the board I made it easier to add a STA301A so it would be easy for me use this board to drive brighter and more power hungry lights or devices around the home and have them all wirelessly controllable from my tablet/phone. 

Friday 14 September 2012

Burningman wireless bike lights

Some good friends of mine wanted some bike lights for Burning man this year, but did not want just bike lights. 

RGB wireless bike light

So I created them wireless bike lights that beep and flash like a car alarm arming/disarming. When in the on mode the head light is on and a string of LED will pulse allowing them to see and be seen.


For the electronics I used one of my Arduino based RFnode as a base but to drive the power hungry LEDs I used a STA301A connected to 3 of the PWM pins of the ATmega168. This allowed me to drive 3 strings of LEDs with PWM support. 


I got a little creative and limited by space and time I mounted the STA301A to the RFnode with some hot glue and mounted surface mount resistors directly to the pins of the IC. Most of the wiring was air wiring as I did not have time to get a customer board fabricated.

For the radio instead of using the nRF24l01+ I found some small key finder fobs that can stay powered from a coin cell battery for months so decided to use them as I could get the power consumption down to less then 1mAh when in sleep mode.   


I was in a bit of a rush to get the units finished before Burningman so I don't have any pictures of the hardware jammed back into the bike light casing and the extra wiring of the LEDs yet. I might add that one they get back.